Saturday, January 25, 2020

Trouble shooting Mixer /Grinder Problems

Some frequently occurring mixer /grinder problems and their solutions are given in the following table:

1. Problem: Unit fails to start
Solution :

  • Ensure cord is plugged -in properly 
  • Ensure power supply is active 
  • Ensure the unit is switched -on 
  • Ensure that the jar is not overloaded 
2. Problem: Motor stopped 
Solution :
  • Ensure cord is plugged -in properly 
  • Ensure that the grinder safety knob is not loose 
  • Switch -off the unit and unplug 
  • Let the juicer cool down from overheating 
3. Mixer does not function at all speeds 
Solution : 
  • Check the speed control 
  • Replace if defective 
4. Motor hums but beaters don't rotate 
Solution : 
  • Check motor 
  • Replace if defective 
5. Excessive vibration in mixer Solution : 
  • Check and replace beaters if defective 
  • Check and service gears if broken or misaligned 
  • Check and replace motor if defective 
6. Mixer noisy :
Solution :
  • Switch -off the mixer and unplug 
  • Stir the contents into middle of jar from the walls 
  • Add water and start 
7. Overflowing jar: 
Solution : 
  • Check and reduce excess liquid from jar 
  • Check and fit the cap properly 
8. Jar leaking from below 
Solution :
  • Check blade shaft /kar brush 
  • Replace if worn-out 

Monday, January 20, 2020

Parts of Juicer

The following table shows the different parts of juicer:


  1. Plunger 
  2. Hopper 
  3. Drum lid 
  4. Juicing screw
  5. Strainer 
  6. Rotation wiper 
  7. Juicing bowl 
  8. Base 
  9. Pulp cup
  10. Juice cup 
Assembling Juicer 
The following table shows the steps to assemble different parts of juicer 
  1. Put the juicing screw into strainer . Position the set into rotation wiper. Turn until the juicing screw clicks into position. 
  2. Push the strainer down the juicing bowl until it clicks into position 
  3. Position the drum lid on the juicing bowl 
  4. Assemble the top set onto the base 
  5. Ensure that it clicks into place 
  6. Position the juicer cup and the pulp cup into their place 
Dissembling Juicer 
The following table shows the steps to dissemble different parts of juicer:
  1. Open the drum lid by turning it in anti-clockwise direction 
  2. Life the juicing bowl off the base by turning it in anti-clockwise direction 
  3. Separate the bowl from the set of rotation wiper, strainer and juicing screw 
  4. Dissemble the juicing screw and strainer from the rotation wiper 
Using Juicer 
A juicer is very simple and easy to use. The following figure shows the steps of using a juicer:
  • Wash and prepare the required fruits and vegetables 
  • Plug in the juicer 
  • Place the juice cup and pulp cup into position 
  • Switch -on the juicer 
  • Insert the fruit/vegetable one place at a time into the chute 
  • Turn off the juicer after the juicing process is complete 
Cleaning juicer 
It is very important to take proper care of juicer. It should be cleaned thoroughly after every use. The following figure shows the steps of cleaning a juicer:

Step 1. Switch-off the power and unplug the juicer 
Step 2. Follow the dissembling process 
Step 3. Wash the parts in running water 
Step 4. Clean holes of strainer with a brush and mild soap solution 
Step 5. Swipe the with a soft damp cloth 
Step 6. Clean all metal parts thoroughly 
Step 7. Let all parts dry completely before storing 

Types of Juicer

There are many types of juicer depending on their how the juicer is extracted. The following figure shows the different types of juicers:

Centrifugal juicer 

  • Produce is inserted into a chute and a shredder plate shreds the produce and spins the pulp into the basket 
Masticating juicer 
  • The produce is inserted from top and a slow rotating auger crushes it againt the mesh screen. 
Citrus juicer or Reamer 
  • A motorised reamer squeezes citrus fruits such as orange, lemon and grapefruit and the juice flows down 

What is Juicer?

It is electrical kitchen appliance used for extracting juice out of fruits and vegetables. It crushes or shreds the fruits and vegetables against a mesh filter that separates pulp from liquid content. The following figure shows a common household juicer:

Saturday, January 18, 2020

Parts of Mixer


  1. Lid 
  2. Liquidizing jar 
  3. Dry grinding jar 
  4. Wet grinding jar 
  5. Blender grinding blade 
  6. Dry grinding blade 
  7. Wet grinding blade 
  8. Base unit 
Before First Use 
The following figure lists the things to check before using the mixer/grinder for the first time:
  • Check that all parts are present 
  • Check for any damage to the unit or attachments 
  • Wash the jars, lids and blades in warm soapy water 
  • Clean the body with soft damp cloth 
  • Ensure that the motor shaft rotates freely and smoothly 
  • Ensure that the jar shaft rotates freely and smoothly 
Using Mixer / Grinder 
A mixer/grinder is very simple and easy to use. The following figure lists the steps of using a mixer/grinder:
  • Select the required jar 
  • Fill the jar with ingredients 
  • Close the jar with lid 
  • Position the jar on the base unit 
  • Turn the jar clockwise to lock it in position 
  • Plug inplace a hand over the lid and switch -on 
  • Start with the slowest speed 
  • To unlock the jar, turn it anticlockwise 
Auto Overload Protector (OLP)
The mixer /grinder comes equipped with protection against sudden overloads. In such situations, the OLP trips and the mixer /grinder shuts -off immediately. This protects the unit from burning and enhances the motor life. The OLP button is located at the bottom of the unit. The following figure shows the location of OLP in a mixer/grinder:

The following figure lists the steps involved case the mixer /grinder stops due to OLP 
  • Switch -off the mixer /grinder 
  • Wait for the motor to cool down 
  • Reduce the ingredient load 
  • Leeds the OLP button 
  • Restart the unit 
Cleaning the mixer /grinder 
All the parts of a mixer /grinder such as jars, blades and the base unit should be cleaned thoroughly after every use. 

Cleaning the jars 
The following figure shows the steps of cleaning the jars of a mixer /grinder 

Step 1. Pour mild soap water into the jar 
Step 2. Place the jar on the base and run for some time 
Step 3. Remo7and wash the inside of the jar with water 
Step 4. Run the jar for 2-3 seconds 
Step 5. Keep the jar inverted to dry 

Cleaning the base unit 
The following figure shows the steps of cleaning the base unit of a mixer /grinder :

Step 1. Unplug the unit 
Step 2. Separate it from the jar 
Step 3. Clean thoroughly with a soft, damp cloth 
Step 4. Do not immerse the unit in water 

Cleaning the blades 
The following figure shows the steps of cleaning the blades of a mixer /grinder :

Step 1. Turn the jar upside down 
Step 2. Loosen the threaded bottom disc by turning it anti -clockwise 
Step 3. Remove the disc, sealing ring and blade
Step 4. Clean the under running water 
Step 5. Let the blade dry completely before storing 

Wednesday, January 15, 2020

Types of Mixers

There are many types of mixers depending on their usage. The following figure shows the different types of mixers:

Stand mixer

  • Contains attachments such as whisk, beater and dough hook to mix different type of ingredients 
Hand Mixer 
  • Hand-held mixing device. The handle is mounted on enclosed motor which drives the beaters 
Spiral mixer
  • Contains a stationary spiral shaped agitator and rotating bowl 
Smeary mixer 
  • Contains a stationary bowl and rotating agitator to mix, whip or blend ingredients
Dough mixer 
  • Used for kneading large quantities of dough 

What is a Mixer/Grinder?

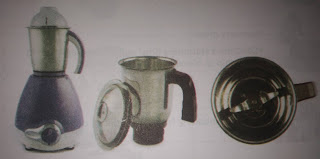
It is an electrical kitchen appliance used for mixing and grinding food. It has different jars for mixing, wet grinding and dry grinding. It uses gears to rotate a set of beaters to mix food contained in a bowl. The high-speed spinning blade grinds the material while mixing it. The following figure shows a common household mixer/grinder:

Download Song

 Download Song Shreya Ghoshal song