Saturday, January 25, 2020

Servicing /Replacing the Components of Mixer/Grinder

To ensure that the mixer/grinder functions properly, it is important to do servicing of components such as speed control switch and gears.

Servicing the speed control switch 
A switch is a simple component that is used to stop or start the operation of any motor. A speed control switch is a three speed switch used to select low, medium or high speed by rotating the knob.  The speed is controlled by providing varying current to the motor of the mixer/grinder . The following figure lists the steps of servicing a switch :

Remove the housing around the switch
⬇️
Check the switch terminals 
⬇️
Mark the position of terminal wires 
⬇️
Disconnect terminal wires
⬇️
Use a continuity tester to test the switch 
⬇️
Replace if defective 
⬇️
Reconnect the terminal wire 

Servicing the Gears 
The mixer /grinder has a gear mechanism that rotates the beaters in opposite direction to mix the ingredients. 

The following figure lists the steps of servicing the gears :

Unplug the mixer /grinder 
⬇️
Remove the housing and expos3 the gears 
⬇️
Inspect and lubricate the gears 
⬇️
Ensure that the lubricant does not touch motor 
⬇️
Remove any pieces or shavings in the housing 
⬇️
Reassemble the housing 

Replacing a fuse 
A fuse is device used to protect the wiring of an electrical appliance from overheating and catching fire due to overload or short circuit. If the motor of the mixer/grinder stops working, its fuse may be blow. The following figure lists the the steps of replacing a fuse:
Remove the housing and access the motor 

Disconnect the fuse from the motor 

Use a continuity tester to test the fuse 

Replac if defective 

Reassemble the housing 

Replacing the motor 
The mixer /grinder /juicer runs on a single -phase induction motor. The following figure lists the steps of replacing the motor:

Remove the housing and access the motor 
⬇️
Use a continuity tester to test the motor 
⬇️
If defective, remove attached wires 
⬇️
Disconnect motor 
⬇️
Replace with a motor of same rating 
⬇️
Reassemble the housing 
Trouble shooting Mixer /Grinder Problems

Some frequently occurring mixer /grinder problems and their solutions are given in the following table:

1. Problem: Unit fails to start
Solution :

  • Ensure cord is plugged -in properly 
  • Ensure power supply is active 
  • Ensure the unit is switched -on 
  • Ensure that the jar is not overloaded 
2. Problem: Motor stopped 
Solution :
  • Ensure cord is plugged -in properly 
  • Ensure that the grinder safety knob is not loose 
  • Switch -off the unit and unplug 
  • Let the juicer cool down from overheating 
3. Mixer does not function at all speeds 
Solution : 
  • Check the speed control 
  • Replace if defective 
4. Motor hums but beaters don't rotate 
Solution : 
  • Check motor 
  • Replace if defective 
5. Excessive vibration in mixer Solution : 
  • Check and replace beaters if defective 
  • Check and service gears if broken or misaligned 
  • Check and replace motor if defective 
6. Mixer noisy :
Solution :
  • Switch -off the mixer and unplug 
  • Stir the contents into middle of jar from the walls 
  • Add water and start 
7. Overflowing jar: 
Solution : 
  • Check and reduce excess liquid from jar 
  • Check and fit the cap properly 
8. Jar leaking from below 
Solution :
  • Check blade shaft /kar brush 
  • Replace if worn-out 

Monday, January 20, 2020

Parts of Juicer

The following table shows the different parts of juicer:


  1. Plunger 
  2. Hopper 
  3. Drum lid 
  4. Juicing screw
  5. Strainer 
  6. Rotation wiper 
  7. Juicing bowl 
  8. Base 
  9. Pulp cup
  10. Juice cup 
Assembling Juicer 
The following table shows the steps to assemble different parts of juicer 
  1. Put the juicing screw into strainer . Position the set into rotation wiper. Turn until the juicing screw clicks into position. 
  2. Push the strainer down the juicing bowl until it clicks into position 
  3. Position the drum lid on the juicing bowl 
  4. Assemble the top set onto the base 
  5. Ensure that it clicks into place 
  6. Position the juicer cup and the pulp cup into their place 
Dissembling Juicer 
The following table shows the steps to dissemble different parts of juicer:
  1. Open the drum lid by turning it in anti-clockwise direction 
  2. Life the juicing bowl off the base by turning it in anti-clockwise direction 
  3. Separate the bowl from the set of rotation wiper, strainer and juicing screw 
  4. Dissemble the juicing screw and strainer from the rotation wiper 
Using Juicer 
A juicer is very simple and easy to use. The following figure shows the steps of using a juicer:
  • Wash and prepare the required fruits and vegetables 
  • Plug in the juicer 
  • Place the juice cup and pulp cup into position 
  • Switch -on the juicer 
  • Insert the fruit/vegetable one place at a time into the chute 
  • Turn off the juicer after the juicing process is complete 
Cleaning juicer 
It is very important to take proper care of juicer. It should be cleaned thoroughly after every use. The following figure shows the steps of cleaning a juicer:

Step 1. Switch-off the power and unplug the juicer 
Step 2. Follow the dissembling process 
Step 3. Wash the parts in running water 
Step 4. Clean holes of strainer with a brush and mild soap solution 
Step 5. Swipe the with a soft damp cloth 
Step 6. Clean all metal parts thoroughly 
Step 7. Let all parts dry completely before storing 

Types of Juicer

There are many types of juicer depending on their how the juicer is extracted. The following figure shows the different types of juicers:

Centrifugal juicer 

  • Produce is inserted into a chute and a shredder plate shreds the produce and spins the pulp into the basket 
Masticating juicer 
  • The produce is inserted from top and a slow rotating auger crushes it againt the mesh screen. 
Citrus juicer or Reamer 
  • A motorised reamer squeezes citrus fruits such as orange, lemon and grapefruit and the juice flows down 

What is Juicer?

It is electrical kitchen appliance used for extracting juice out of fruits and vegetables. It crushes or shreds the fruits and vegetables against a mesh filter that separates pulp from liquid content. The following figure shows a common household juicer:

Saturday, January 18, 2020

Parts of Mixer


  1. Lid 
  2. Liquidizing jar 
  3. Dry grinding jar 
  4. Wet grinding jar 
  5. Blender grinding blade 
  6. Dry grinding blade 
  7. Wet grinding blade 
  8. Base unit 
Before First Use 
The following figure lists the things to check before using the mixer/grinder for the first time:
  • Check that all parts are present 
  • Check for any damage to the unit or attachments 
  • Wash the jars, lids and blades in warm soapy water 
  • Clean the body with soft damp cloth 
  • Ensure that the motor shaft rotates freely and smoothly 
  • Ensure that the jar shaft rotates freely and smoothly 
Using Mixer / Grinder 
A mixer/grinder is very simple and easy to use. The following figure lists the steps of using a mixer/grinder:
  • Select the required jar 
  • Fill the jar with ingredients 
  • Close the jar with lid 
  • Position the jar on the base unit 
  • Turn the jar clockwise to lock it in position 
  • Plug inplace a hand over the lid and switch -on 
  • Start with the slowest speed 
  • To unlock the jar, turn it anticlockwise 
Auto Overload Protector (OLP)
The mixer /grinder comes equipped with protection against sudden overloads. In such situations, the OLP trips and the mixer /grinder shuts -off immediately. This protects the unit from burning and enhances the motor life. The OLP button is located at the bottom of the unit. The following figure shows the location of OLP in a mixer/grinder:

The following figure lists the steps involved case the mixer /grinder stops due to OLP 
  • Switch -off the mixer /grinder 
  • Wait for the motor to cool down 
  • Reduce the ingredient load 
  • Leeds the OLP button 
  • Restart the unit 
Cleaning the mixer /grinder 
All the parts of a mixer /grinder such as jars, blades and the base unit should be cleaned thoroughly after every use. 

Cleaning the jars 
The following figure shows the steps of cleaning the jars of a mixer /grinder 

Step 1. Pour mild soap water into the jar 
Step 2. Place the jar on the base and run for some time 
Step 3. Remo7and wash the inside of the jar with water 
Step 4. Run the jar for 2-3 seconds 
Step 5. Keep the jar inverted to dry 

Cleaning the base unit 
The following figure shows the steps of cleaning the base unit of a mixer /grinder :

Step 1. Unplug the unit 
Step 2. Separate it from the jar 
Step 3. Clean thoroughly with a soft, damp cloth 
Step 4. Do not immerse the unit in water 

Cleaning the blades 
The following figure shows the steps of cleaning the blades of a mixer /grinder :

Step 1. Turn the jar upside down 
Step 2. Loosen the threaded bottom disc by turning it anti -clockwise 
Step 3. Remove the disc, sealing ring and blade
Step 4. Clean the under running water 
Step 5. Let the blade dry completely before storing 

Wednesday, January 15, 2020

Types of Mixers

There are many types of mixers depending on their usage. The following figure shows the different types of mixers:

Stand mixer

  • Contains attachments such as whisk, beater and dough hook to mix different type of ingredients 
Hand Mixer 
  • Hand-held mixing device. The handle is mounted on enclosed motor which drives the beaters 
Spiral mixer
  • Contains a stationary spiral shaped agitator and rotating bowl 
Smeary mixer 
  • Contains a stationary bowl and rotating agitator to mix, whip or blend ingredients
Dough mixer 
  • Used for kneading large quantities of dough 

What is a Mixer/Grinder?

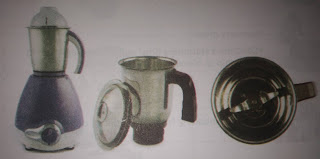
It is an electrical kitchen appliance used for mixing and grinding food. It has different jars for mixing, wet grinding and dry grinding. It uses gears to rotate a set of beaters to mix food contained in a bowl. The high-speed spinning blade grinds the material while mixing it. The following figure shows a common household mixer/grinder:

Monday, January 13, 2020

General Safety Procedures

The field technician must adhere to the safety procedure. There are certain guidelines that must be followed to ensure own safety. There guidelines provide a sound,  safe and flexible environment to work. The following figure examination the general safety guidelines that must be followed by field technician:

Check if the tools and equipment are in a good working condition 

Wear personal protective equipment 

Keep the work the work area clean and free from clutter 

Maintain proper body posture at work 

Follow safety rules and guidelines 

Report any breach of safety 

Safety Procedures to be Followed While Installation 
The following figure explains the safety guidelines that must be followed by a field technician when installing an RO system:

Disconnect the water supply before beginning installation 

Install the purifier away from direct sunlight 

Connect the water feed line to cold water supply only 

Never touch the membrane with bare hands 

Follow manufacturer's instructions regarding installation 

Safety Procedures to be Followed While Doing Repair Maintene7
The following figure explains the safety guideline that must be followed by field technician when doing repair or maintenance of an RO system:

Ensure that all connections are secure 

Never apply bleach or cleaning solution to the membrane 

Do not keep the filter cartridge outside its packing 

Do not dip the TDS meter beyond the water limit 

Troubleshooting

Troubleshooting refers to repair of faulty products or processes. It begins with searching for the source of a problem and ends with finding the solution for that problem to ensure that the product or process functions properly. Good troubleshooting consists of the following four steps:

  • Identification of the symptoms 
  • Verification of the solution 
  • Restoration of the product or process 
The field technician should follow some simple steps for troubleshooting as shown in the following figure:
Identify the exact nature of the problem by observing symptoms 

Isolate the cause of the problem by testing the likely caused 

Resolve the problem 

Troubleshooting Chart 
The following table lists some common problems and their solutions:


Saturday, January 11, 2020

Maintenance of RO Water Purifiers

To ensure that the water purifier provides the same quality water, it is essential to do periodic maintenance of the system. The following figure lists the components of the maintenance of an RO system:

Maintenance of an RO system 

  • Check TDS of water 
  • Check valves 
  • Clean and sanitize RO system
  • Change filters and membrane 
Check TDS of water 
Water is often called the universal solvent because it picks up impurities easily. The impurities can be minerals, salts, metals or ions and are also known as 'Dissolved solids'. 
These dissolved solids increase the electrical conductivity of water. 
TDS is used as a measure to determine the purity of water and the quality of water purification system. 

Total Dissolved Solids (TDS) 
Total Dissolved Solids (TDS) are the total amount of dissolved solids present in water. It is the sum of positively charged ions (cations)  and negatively charged ions (anions)  in the water. It is measured in units of Mg per unit volume of water (mg/L) and is also referred to as parts per million (ppm).
The maximum contamination level advised for TDS is 500 Mg/L and a high level of TDS indicate the possibility of toxic ions such as lead,  arsenic, cadmium and others dissolved in water. The following figure shows the various levels of TDS in water:
Level of TDS in water

It is important to monitor the TDS regularly to ensure that the water purification system is effective in removing unwanted particles from water. 
The following figure lists the reasons for testing water for high TDS:

  • Results in undesirable taste of water 
  • Indicates the presence of toxic minerals 
  • Causes adverse effects on health 
  • Indicates hardness of water 
  • Indicates that the filters /membrane needs to be changed
TDS Meter 
TDS of water or any solution is measured with the help of TDS meter. It is a small hand held device that measures the electrical conductivity of water and estimates the TDS from that reading. The following figure shows a commonly used TDS meter:
TDS meter 

Taking TDS Measurements 
A TDS meter is very easy and simple to use. The following figure lists the steps of taking TDS measurements using a TDS meter:

Step 1: Collect water in a clean glass
Step 2: Remove the cap and turn the                 TDS meter on
Step 3: Insert the meter into the water
Step 4: Lightly stir the water to                           displace any air bubbles 
Step 5: Wait for the display to stabilize
Step 6: Press the HOLD button toview               the reding
Step 7: Remove the meter and shake                 off excess water 
Step 8: Replace the cap 

Check valves 
An RO system has two types of valve - Auto-shut-off valve (ASV)  and check valve (CV). If either of the two is defective then the RO system will not shut-off and the water will be running constantly. 

The following figure lists the steps involved in checking auto-shut-off valve and check valve:
  • Ensure that the tank is not empty 
  • Remove the drain line from the drain saddle 
  • Turn off the water supply line 
  • Turn-on the tank valve
  • Check if drain water is running 
  • If water is running then ASV or CV is defective 
  • Replace the CV and check water drainage 
  • If water stops, stop testing 
  • If water continues to drain, replace ASV 
Clean and Sanitize RO System 
An RO system should be cleaned and sanitized at least once every year. The steps to sanitize an RO system are listed in the figure:
Turn off the water supply line and open the faucet 

Place a towel/tray under the unit for water spills 

Empty the tank and shut the faucet off

Remove all filters and membrane 
⬇️
Replace the filter housings 
⬇️
Add the sanitizer
⬇️
Turn on the water supply line
⬇️
Fill the system with sanitizing solution
⬇️
Flush out the system until clear water starts flowing 
⬇️
Wait for few minutes and flush again
⬇️
Re-install all filters and membrane 
⬇️
Fill and flush the system once more 

Changing Filters and Membrane 
It is recommended to change the filters /membrane of an RO system as per the following schedule:

Sediment filter 
Change every 6-12 months 

Carbon filter 
Change every 6-12 months 

Carbon post filter 
Change every 12 months 

Reverse Osmosis membrane 
Change every 24 months 

When changing filters or membrane of the system, it is vital to follow appropriate sanitation and service procedures as outlined in the following figure:

Ensure correct cartridges are used for replacement 
Remove the cartridge from packaging only after service is complete 
Ensure the area around system is free from dust 
Be sure to wash hands before starting work 
Be careful not to run hot water through the unit 

Changing filter
The following figure lists the steps involved in changing the filter:
  • Turn off the watersupply line and open the faucet 
  • Place a tower /tray under the unit for water spills 
  • Unscrew the filter housing cap and remove the cartridge 
  • Wipe the O-ring clean and replace if damaged 
  • Rinse the inside of filter housing and insert new filter
  • Lightly lubricate the O-ring and place it back 
  • Carefully screw back the housing cap 
  • Turn on the water supply and check for leaks 
  • Turn on the faucet and allow water to flow 
Changing Membrane 
The following figure explains the steps involved in changing the membrane :
  • Turn off the water supply line and open the faucet 
  • Place a towel /tray under the unit for water spills 
  • Disconnect the tubing from the membrane housing 
  • Free the membrane fom the clips 
  • Wipe the O-ring clean and replace if damaged 
  • Unscrew the membrane housing cap and remove the membrane 
  • Rinse the inside of membranes housing and insert new membranes 
  • Lightly lubricate the O-ring and place it back 
  • Replace and tighten membranes housing cap 
  • Turn on the water supply and check for leaks
  • Turn on the faucet and allow water to flow 

Inform the Customer about the DOS and Don'ts of Maintenance 
Inform the customers that an RO water purifier lasts for many years if it is maintained properly. The following figure shows the various Dos and Don'ts that should be followed :

Do not place heavy or sharp objects on the purifier 
Drain the water form the tank if it has not been used for over 2 days
Do not apply force on the water dispensing lever 
Use only genuine spare parts 
Change the filters and membranes regularly 

Suggest a Solution to the Customer

After identifying the issue, the field technician needs to offer solutions. He should explain all the possible solutions along with the cost associated. He should then propose the best solution and let the customer decide whether to go ahead with the given solutions or not.

The following figure shows the steps involved in offering solutions to a customer:

Suggest solutions to the customer  
⬇️
Explain the time for fixing the issue 
⬇️
Explain the service method - repair or replacement of part 
⬇️
Explain the costs involved 
⬇️
Seek the customer's approval for further action

Confirmation of Functionality of the Repaired Module 
Once the purifier has been repaired, ensure that the unit is functioning properly with the repaired or replaced parts. The following figure lists the checks that should be performed after repairs are complete:
  • Check that all connections are secure
  • Check leaks 
  • Check the flow of water 
  • Check the TDS of water 
Take Feedback from Customer 
The last step of understanding customer's concerns is to take feedback from the customer as this is the most important thing for an organization. The procedure as shown in the following figure should be followed:
The time taken to resolve an issue and the difficulties that a customer encountered while communicating the problem should be understood. The misunderstanding observed during the interaction should be clearly documented. 
The methods of interaction and behavioral aspects also need to be considered in drawing conclusions after each task or problem handing routine. Getting honest feedback from the clients helps to improve the organizational functioning. 
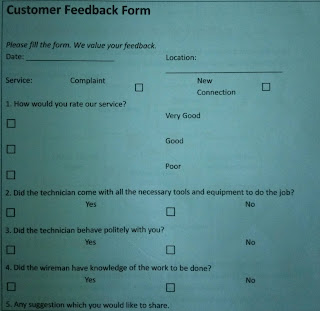
The field technician can get a feedback from filled by the customer at the facility. The following figure shows a typical template for a customer feedback form:

Understand the Symptoms and Identify the Fault

It is very important for a technician to identify the fault correctly. Wrong identification of fault will lead to wrong solution which will be waste of time and money and can also cause damage to the appliance.

When visiting a customer for a repair/servicing request, it is important to know the details of the problem and accordingly suggest a corrective measure. The customer should be satisfied with the suggested solution. The following figure highlights the to-do list to be followed at a customer's premises:

At customer's
Premises

  • Enquire about the symptoms and history of problem 
  • Ask about the year of purchase,  service and warranty 
  • Identify the problem based on customer's information and examination 
  • Communicate the problem identified to the customer and inform about possible reasons 
  • Inform the customer regarding the costs involved and hand over the invoice after task is completed 
  • Ensure service is provided to achieve 100% customer satisfaction 

Identify the Concerns of the Customers

A field technicians is responsible for the maintenance and repair of RO system installed at custmer's premises. It is very important for him to clearly understand the concerns of the customer. The following figure represents the various activities which should be done before scheduling a visit to the customer's premises:

Check the new requests or complaints registered by the customers 
⬇️
Based on the requests/complaints and location of the customer, make a route plan for the day 
⬇️
For repairs, anticipate the problem 
⬇️
Call the customer to confirm the visit time
⬇️
Carry tools and parts accordingly 

Interact with the Customers on Phone 
Prior to visiting a customer's premises for repairing/servicing, it is important to call the customer and ask about the problem in detail. 

The following figure highlighter the to-do list to be followed when on a cell with a customer before visiting the premises:

During a cell with a customer 

  • Enquire about the symptoms 
  • Ask about the service,  repair,  maintenance and AMC of the equipment
  • Identify the problem based on the customer's information
  • If the problem can be resolved over the phone, try to do it otherwise commence a field trip 
  • Confirm the address and inform about the time of visit 
Interact with the Customer at their Premises 
It is good practice to be humble and respectful towards the customer. The following figure represent how to interact with a customer when visiting the premises for service/repair:

  • Smile and greet the customer 
  • Listen to the customer's problem/request
  • Offer the most effective solution 
  • Take feedback of the customer and share with the supervisor 

Friday, January 10, 2020

Post-installation Process of RO Water Purifiers

Once the purifier has been successfully installed, it is time to follow the post - installation process to ensure completion of the installation process. The post - installation process consists of tasks as shown in the following figure:

Post-installation process 

Check the system's functioning 

Providing to the customer 

Documentation

Check the System's Functioning 
Perform the checks as shown in the following figure to ensure that the purifier is working properly:

Switch on the power supply and check that all the connections are secure 
⬇️
Turn on the inlet valve and check for leaks
⬇️
Turn on the storage tank valve
⬇️
Wait till the storage tank fills up 
⬇️
Open the faucet to let the water flow ⬇️
Close the faucet and check for leaks
⬇️
Open the drain plug to remove any dust particles present in the pipes or storage 
⬇️
Close the drain plug 

Providing Guidance to the Customer 
After installing the purifier, the field technician should give a demonstration of the working of the purifier. It is a way of promoting or showing the operation of purifier to the users. The goal of demonstrating is to show the customer how to operate and use the purifier. There are a few rules which must be considered while preparing for the demo. The following figure lists these rules:

Customize 
your demo

Take customer                          Rehearse
Feedback.                                   before 
                                                 presenting 

Test 
everything 
beforehand

Documentation 
The last task of the post-installation process is to fill in all the details in the installation report clearly and get feedback from the customer. The following image shows a typical template clearly of the installation from that the field technician should gill-in after installing an RO system:

Thursday, January 9, 2020

Installation of RO Water Purifiers

The installation process begins with site preparation. The recommended site preparation steps are shown in the following figure:


  • Ensure single phase connection is within 3m of the point of installation 
  • Ensure raw water supply is within 3m
  • Ensure raw water supply tank is at least 10 feet above the purifier 
  • Ensure there is a sink near the purifier
  • Ensure waste water drain is within 3m
  • Ensure enough space is there as per the dimensions of the purifier 
Installation Procedure 

The following steps should be performed when installing a wall mounted RO water purifier:
  1. Disconnect the water supply line from the normal tap water. 
  2. Mark screw locations at same horizontal level on the wall. 
  3. Screw in two self -taping screws into the marked positions. 
  4. Hang the purifier with the help of wall mounting screws present at the back of the purifier. 
  5. Fix the SS ball valve to the port of 3-way connector. 
  6. Connect the raw water supply to the 3-way connector:                                       a. Connect the threaded end of the connector to the raw water supply.        b.  Connect the other end to a tap, if     required. 
  7. The left side of the purifier has a lower pushfit elbow fitting labeled as WAYER IN. 
  8. Take the white pipe which is for raw water supply:                                               a. Connect one end to the a SS ball     valve.                                                           b.  Connect the other end to the   WAYER IN fitting. 
  9. The left side of the purifier has an upper pushfit elbow fitting labeled as REJECT WATER 
  10. Take the blue pipe which is for reject water.                                                           a.  Connect one end to the REJECT   WATER fitting.                                           b. Leave the other end in the drain. 
  11. Open the ssball to start the flow of water into the purifier. 
  12. Ensure that the filters are soaked in water before connection the power supply.     

Pre-installation Process of Water Purifiers

Before beginning the installation, the pre-installation process should be followed to ensure that the unit is properly installed. The pre-installation checks of tasks as shown in the following figure :

Inspection 
Inspect the carton and the unit to ensure there are no concealed damages due to rough handling 

Removing the package 
Remove the components from the shipping carton carefully 

Package validation 
Check that all installation parts such as the unit, faucet, tubing and installation hardware are present 

The following figure lists the guidelines that should be followed before installing an RO water purifier:

Avoid exposure to direct sunlight or heating devices 

Avoid placing the rejected water pipe at a higher level than the purifier 

Avoid sharp bends in the pipe 

Avoid bending or blocking the rejected water pipe 

Ensure that the puriifer is connected to the normal water supply only 

Ensure that the purifier is installed within 3 meters of the water source 

Avoid confining the purifier in a cabinet 

Wednesday, January 8, 2020

Realme 5i

Key Specs

  • Display : 6.5 inches 
  • Battery : 5000mAh 
  • Rear Camera : 12mp + 8mp +2mp +2mp
  • Front Camera : 8mp 
  • Processor : Media Tek Helio P65 
  • RAM : 4GB 
  • Storeg : 64GB 
Detail 
  • Launched : January 9. 2020
  • Operating systems : Android 9.0 (Pie)  ColorOS 
  • Processor : Media Tek Helio P65 (2GHz Certex A75 dual- core + A55 hexacore )
  • Battery : 5000mAh 10w charging 
  • Camera : Ultra wide-angle Lens 8mp /  primary lens 12mp / Protroit Lens 2mp / macro lens 2mp 
  • Display : 6.5 inch HD+ /water drop        notch 
  • Resolution : 720 x 1600 pixels 

Functioning of RO Water Purifier

The following figure explains the steps involved in the functioning of an RO water purifier:

Step 1 Water enter from the supply line 
Step 2 Water enters the sediment filter which strains out sand, dirt and sediments 
Step 3 Water enters the carbon filter which removes chlorine and other contaminants
Step 4 Water enters the RO membrane which filters out all additional contaminants 
Step 5 Water enters the storage tank
            Waste water containing impurities is drained out 
Step 6 Water enters post filter to remove any remaining odor and taste in water 
Step 7 Water leaves the filter and goes to faucet 

The following diagram shows the flow of water in an RO purifier:

The following diagram shows the flow of electric current in an RO purifier :


Component of RO Water Purifier

The following figure lists the basic components of an RO system:

Supply line valve  Attaches the inlet                                      of the RO pre'filter                                    to the water source                                   through a tube 

Pre-filter sediment Removes sand,                                           dirt and other                                            sediments 

Carbon filter  Address chemical                                      impurities such as                                   chlorine and pesticides                           and improves odor and.                           taste of water 

RO membrane  Removes almost all                                   dissolved salts,                                           impurities and                                           bacteria 

Water tank  Stores water before 'post                         filtration'

Post filter  Also known as 'polishing'                         filter as it removes the                             remaining taste and odor                       from the treated water 

Shut-off valve  Automatically shuts-                                 off the water supply                                  to the membrane                                      when the storage tank                             gets full 

Check valve  Prevents backward flow.                          of water from the tank.                           to the membrane  

Flow restrictor  Maintains pressure                                  on the inlet of the                                      membrane to ensure                                the highest quality of                                water 

Drain  Connects one outlet of the                      membrane to the drain to                        dispose off waste water 

Properties of RO Water Purifier

The properties of an RO water purifiers are shown in the following figure :

Suitable for hard water 

Removes dissolved salts and organic and inorganic particles

Removes dissolved impurities such as sulfates, fluorides, bacteria, pesticides, arsenic and chloramines 

Improves taste, odor and appearance of water 

Economical to purchase and easy maintain 

Simple operation and control 

RO Water Purifier

RO water purifiers work on the principle of Reverse Osmosis (RO). In this process, pressure is applied on contaminated water to force it through a semi-permeable membrane. The water is purified by filtering and flushing out the impurities as shown in the following image :

Sunday, January 5, 2020

Type of Water Purifier

There are five major categories of water purifiers, depending on the purification methods they use. The following figure lists these categories :


RO Water Purifiers 
RO water purifiers are the most commonly used purifiers and are based on the principle of reverse osmosis. They make use of the membrane technology to eliminate contaminants such as salts, heavy metals and germs dissolved in water. The following image shows an RO purifier membrane :

The main advantage of using an RO purifier are as shown in the following figure :

Removes impurities such as lead, arsenic, mercury and germs from water 
⬇️
Environmental friendly 
⬇️
Suitable for hard water 
⬇️
Suitable for hard water with high total dissolved salts (TDS) 
⬇️
easy to install and maintain 

There are certain disadvantages of an RO purifier such as:

  • Removes essential minerals along dissolved impurities 
  • Alters the taste of water 
  • Wastes large quantity of wayer
  • Requires electricity to purify water
  • Requires special care and maintenance for it's membrane 
UF Water Purifiers 
UF water purifiers use membranes similar to an RO membrane but with large pores. They remove all germs and bacteria from water but do not remove dissolved salts or solids. They are suitable in homes where the water supplied is not very hard and less dissolved salts. The process of privation in a UF purifier is shown in the following image :

The main advantages of using a UF purifier are as shown in the following figure :

Removes impurities and germs from muddy water 
⬇️
Environmental friendly 
⬇️
Does not require electricity to purify water 
⬇️
Retains the taste and odor of water 
⬇️
Easy to install and maintain 

There are certain disadvantages of a UF purifier such as:
  • Unable to remove dissolved impurities such as arsenic, lead, nitrates and fluoride 
  • Ineffective as compared to an RO water purifier as it cannot block dissolved salts and solids 
  • Good only for water with low TDS 
UV Water Purifiers 
UV water purifier use ultraviolet rays to kill all germs,  bacteria and microbes dissolved in water. A small mercury lamp is placed inside the purifier, which produces high frequency short wave UV radiations. When water passes through this element, it is exposed to the UV light which kills all the living organisms. 
Separate filters then remove the dead germs. 
UV purifiers are used in residences, breweries, water stores,restaurants and municipalities. 
The following image shown the working of UV water purifiers:
The main advantage of using a UV purifier are as shown in following figure :

Removes viruses, bacteria and germs from water 
⬇️
Environmental friendly 
⬇️
No chemicals added to wayer
⬇️
Retains the taste and odor of water 
⬇️
Easy to install and maintain 

There are certain disadvantages of a UV purifier such as:
  • Unable to remove dissolved impurities such as arsenic, lead, nitrates and fluorides 
  • Requires electricity to purify water 
Gravity Based Water Purifiers 
Gravity based water purifiers are based on the principle of gravity. The water flows from a higher compartment over the filters to a lower compartment. They do not require electricity and use either chemical based, UF based or ceramic cartridge based filters to purify water. 

The following figure shows the parts of a gravity purifier :

The main advantages of using a gravity based purifier are as shown in the following figure :

Removes impurities and germs from muddy water 
⬇️
Environmental friendly 
⬇️
Does not require electricity to purify water 
⬇️
Suitable for soft water 
⬇️
Portable and easy to install 

There are certain disadvantages of a gravity based purifier such as:
  • Unable to remove dissolved impuri+ies such as arsenic, lead, nitrates and fluorides
  • Ineffective as compared to an RO water purifiers as it cannot block dissolved salts and solids 
  • Good only for water with low TDS
Activated Carbon Water Purifiers 
Activated carbon is carbon with a positive charge added to it. When water flows over it, the negative ions of contaminants get attracted to the surface of the activated carbon filter. 
Activated carbon water purifiers can remove volatile organic compounds, pesticides, herbicides, chlorine and other chemicals found in tap water. This makes the water safe to drink. 

The following images shows the license of purification in an activated carbon water purifier:

The main advantage of using an activated carbon purifier are as shown in the following figure:

Removes volatile organic chemicals, radon and chlorine 
⬇️
Environment friendly 
⬇️
Eliminates bad order and taste 
⬇️
Cost effective 
⬇️
Does not require electricity to purify water 

There are certain disadvantages of an activated carbon purifier such as:
  • Unable to remove dissolved microbes and impurities such as arsenic, lead, nitrates and fluorides 
  • Ineffective as compared to an RO water filter as it cannot block dissolved salts and solids 
  • Requires frequent filter changes 

Water Purifiers

Pure, clean and safe drinking water is a necessity for human life and health. Water that is supplied in homes is contaminated with organic and inorganic particles. It becomes critical to purify the tap water to ensure it is safe for consumption and does not have any adversely effect on health. A water purifier removes contaminants such as excess salts, suspended particles and microbes dissolved in water and preserve it's necessary vitamins and minerals. 

Friday, January 3, 2020

Water Purification Process

Water purification is the process of removing contaminants from untreated or raw water to get pure water that is safe for consumption. It consists of three different processes .

Physical processes 

  • Filtration, sedimentation and distillation 
Biological processes
  • Slow and filters or biologically active carbon 
Chemical processes 
  • Flocculation, chlorination and the use of ultraviolet light
Steps of the Purification Process 
The water purification process consists of four major steps. 

Coagulation 
⬇️
Sedimentation 
⬇️
Filtration 
⬇️
Disinfection 

Coagulation 
When the water from ground, lakes, or river enters a water treatment plant, it is coagulated by the addition of alum and other chemicals. These sticky particles also known as floc, attract dirt particles which make them heavy and they sink to the bottom. 

Sedimentation 
The water and floc pass into the sedimentation basin. The heavy floc settles down and the water is passed through filtration tanks. 

Filtration 
The filtration tanks consist of layers of gravel and sand which filter out the remaining contaminants. 

Disinfection 
The water is passed into a closed reservoir containing disinfectants such as chlorine. These disinfectants kill the bacteria or micro-organisms present in the water 
The purified water then flows through pipes to homes. 

Water Treatment Methods

Water Treatment Methods 
There are four common types of contaminants that are generally found in water.

Bacteria 
Bacteria are a group of microorganism that are found in plants, soil and water. Most of the bacteria are harmless but some of them can cause sickness and dis3ase in humans. The most common of these are vilified bacteria which are present in intestines of warm feces and can caus3 diseases such as cramps, vomiting, diarrhea and intestinal infection.

Minerals 
Minerals are inorganic substances found in rocks and similar matter in the earth. Some minerals such as calcium, magnesium and potassium are considered good for humans and some such as lead, arsenic, and aluminum we considered harmful. Water is not a table source of minerals as it contains a mix of both types of minerals. The human body cannot absorb the minerals very well. The level of minerals dissolved in water determines it's hardness.

Particulates 
Particulates are minute particles of dirt, sand, rust and sediment found in water. Particulates themselves do not adversely affect health but they are carriers of other harmful contaminants in water : organic, inorganic and microbiological .particulates are measured in microns where one micron is oneillionth of a meter.

Chemicals 
Chemicals contaminants can be natural or man-made. They enter water through pollution, industrial discharge, urban activities, agriculture and disposal of waste. These undesirable contaminants include toxic metal salts, nitrogen, bleach, pesticides, fertilizers, human and animal drugs.
The presence of these contaminants makes water treatment very important. There methods involve removal of contaminants from water to make it safe for human consumption without any risk of unfavorable effects on health.
Water treatment is done at two levels :

Community water treatment 
Public drinking water system use surface water treatment plants to provide safe drinking water to people.

Domestic water treatment 
Individuals use home treatment units such as filters, water softeners and distillation systems to remove specific contaminants, to improve the taste of water and as precaution against disease.

Water treatment methodsbuse different types of agents to make safe for drinking purpose. Water treatment agents can be divided into three categories

Water treatment 
agents 

Chemicals       Filters         Purifiers 

Chemicals 
A variety of chemicals are used in the process of water treatment for the purpose of desalination and stoppage of fouling and scaling. The three most commonly used chemicals are chlorine, chlorine dioxide and ozone. They are used as disinfectants to kill unwanted microorganism present in water and improve the taste, odor and clarity of water. 

Filters 
Filters purify water by removing impurities from it and reducing it's contamination. The filtration process consists of making water flow over some type of filter which blocks the route of the contaminants. The filter can be a physical barrier, chemical process or a biological process. There are main type of filters.

Sediment.               Carbon block 
Fiter.                             filter 

TFC/TFM                 Inline carbon 
membrane.                            filter 

Sediment Filter

Sentiment filter renmove suspended particulate matter such as send, dirt, silt and organic matter from water. Water flows from the outside to the core of the filter and the impurities are retained on the filter surface. They, however, do not remove contaminants such as chlorine, lead, mercury and other organic compounds dissolved in water. 

Carbon Block Filter 
Activated carbon block filters are used to remove contaminants such as chlorine, benzene, which enhances the surface area as well as the ability of absorption of the filter. 

TFC/TFM membrane 
TFC/TFM are semi-permeable membranes used in the reverse osmosis (RO)  water purification systems. Untreated water is forced through the membranes which act like a strainer and allow pure water to pass through leaving the dissolved contaminants be hind 

Inline Carbon Filter 
Carbon filters can also be installed in-line as apart of the reverse osmosis water purification system. They are used as pre-treatment to safeguard other water treatment units, such as TFC/TFM membranes, from any damage due to organic fouling or oxidation. 

Purifiers 
Water purifier remove contaminants such as excess salts, suspended particles and microbes dissolved in water and preserve it's necessary vitamins and minerals. 
The difference between water filters and purifiers is the type of impurities removed by each one of them. 

The following figure lists the main differences between the two:

Water filters
⬇️
Eliminate or minimize impurities such as dissolved salts and heavy metals
⬇️
Filters work like a strainer and prevent unwanted elements from entering 
⬇️
Cannot remove viruses from water 

Water purifiers
⬇️
Eliminate contaminants such as bacteria and viruses present in water 
⬇️
Kills and removes unwanted elements from water 
⬇️
Removes even essential minerals from water 

Download Song

 Download Song Shreya Ghoshal song